Creating Records
A record (bug) is created to add a new issue, bug, task or any other type of record. Regardless of the BUGtrack edition you have subscribed to, your account can handle unlimited records (bugs) with unlimited detail and attachment size. To ensure maximum efficiency, it is a good practice for users to follow three basic principles while working with bugs:
- One record should concern only one issue. When more than one problem is included in a bug, it is quite possible that the work will have to be split between different users by creating new bugs with parts of the original one, which will mean extra work and complicated resolution tracking. However, sometimes a problem might appear as one issue in the beginning and then be split into sub-problems during investigation. In such a case it would be a good idea to create ‘subordinate’ bugs and link them to the original one.
- Bug titles should be precise, descriptive and concise. The bug title should provide virtually every user with a clear idea what it is about. This will ensure fast bug assignments and will speed up resolution. A title like ‘We have a problem’ might tell very little even to the bug’s creator in a couple of weeks since the bug was posted.
- Bug details should be comprehensive. The more relevant detail is provided, the faster the problem can be identified and fixed. Although a problem may seem to be obvious, it might be completely new to the people who will try to resolve it. In addition, a detailed description of the circumstances in which the problem occurred would definitely help to identify and resolve it.
Procedure
Step one. Click the New Entry tab. (Only users having permissions to “Create” granted in Roles will be able to create a new record entry).
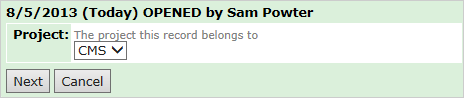
Step two (relevant only when the project navigation picklist field is set to ‘All projects’). Select the project to which the bug belongs. Click the Next button to proceed.
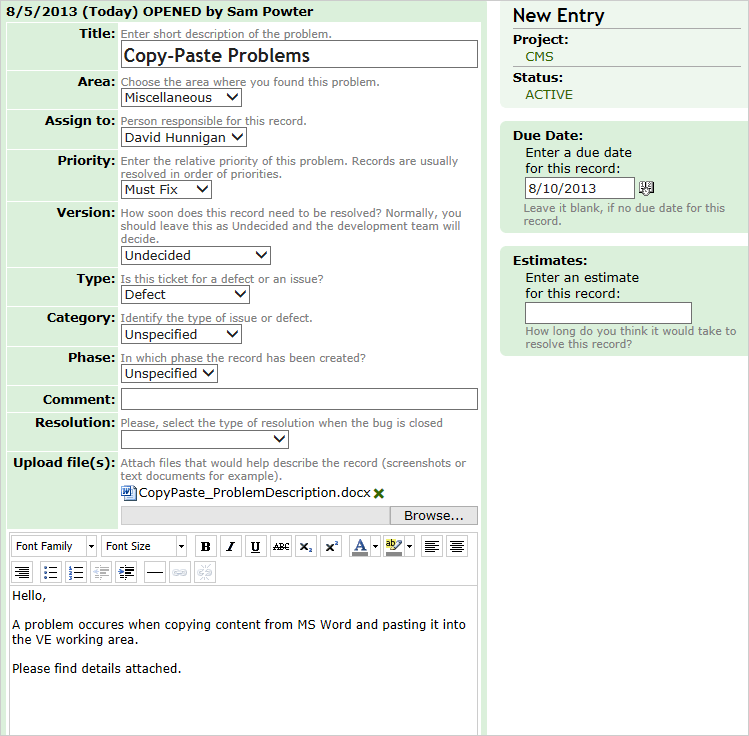
Step three. Enter record’s Title (up to 128 characters) and specify other record attributes by selecting appropriate values from the picklists.
Step three (optional). If you would like to upload a file and attach it to your record, specify the local file path in the Upload file(s) field. This might be a screenshot or a source code file, for example. If you need to upload more than one file, you can
- Either pack them into one archive and attach it to your record once, or
- Attach every file separately, one by one.
Step four. In the Detail field, enter a detailed description of the issue. You can use rich edit controls located above the text-entry area to format your text. The meaning of each button appears as a hint when you place the mouse pointer over it.
To insert a hyperlink, select a text string, then click the Insert a link button and enter the underlying URL.
To check spelling of your message, click the Spell Check button.
Step five (relevant when estimates are used in the project). If a resolution time estimate is applicable, enter it in the Estimate box in the right column (the estimate units (hours/days) are set globally for all projects).
Step six (relevant when due date is used in the project). If a resolution due date is applicable, enter it in the Due date box in the right column. Please note that the mm/dd/yyyy format is used globally for all projects. To easily specify the date, click the Calendar icon under the input field. A defined due date will be highlighted red in a short description of a record in the records list.
Step seven (relevant when comments are enabled in the project). Enter any related description in the Comment field.
Click the Save button to save your record. The new record will acquire a unique ID and will be saved in your BUGtrack database.
Next: Accessing Records