E-mail Interface Settings
This feature is available only in BUGtrack Professional Edition.
Use
By turning on E-mail interface, you may use BUGtrack as an e-mail tracking processor. BUGtrack may be integrated with one or more POP3 e-mail accounts. BUGtrack imports e-mail messages from the specified mailboxes and converts them into trackable records. This allows creating and updating BUGtrack records through e-mail messages, even without logging into BUGtrack. E-mail interface may be used for tracking e-mail discussion between team members or for tracking e-mail requests from anonymous users, such as unregistered customers. It allows using BUGtrack for tracking customer support requests.
The system identifies records by the unique ID in the message subject line after the pound sign ‘#’.
If a record was identified, the system updates the corresponding record as if it was edited. In all other cases a new record will be created. Details submitted in the e-mail body will be available in the record view mode. All basic fields will be predefined by a custom form creation wizard. Users may attach to e-mails multiple files that will be uploaded along with message details. If necessary, you may also see e-mail details by clicking the View Header link in a corresponding details section.
E-mail interface preserves all the rich text and HTML formatting and also loads e-mail attachments.
Path
Admin tab – Import area – Configure e-mail interface link
Procedure
To create a new connection to an e-mail server, click the Add Mail Interface button above the connections list. Then follow the wizard (see below).
To change the settings of an existing e-mail connection, click the Edit icon next to the connection title in the list. Then follow the wizard (see below).
To delete a connection, click the corresponding Delete icon in the list. On the displayed page, click Delete and confirm deletion in the dialog box that will be opened.
E-mail Interface Wizard
Step one. Click the Add Mail Interface button.
In the opened form, specify whether the interface should be enabled or temporary disabled. Enter the e-mail Server (e.g. ‘pop3.mailserver.com’), Port, Login and Password for the account on the server.
Select the Leave a copy of messages on server option if you would like to be able to collect the mail from this account using a standard e-mail client program, such as MS Outlook. It is recommended that you leave the field unchecked to keep your mailbox clean.
Select the This server requires a secure connection (SSL) option if the mail server has a secure certificate installed.

Click the Next button to test and save the connection or the Cancel button close the form without saving.
Step two. Specify the Project to which all records created through this e-mail interface connection will belong.
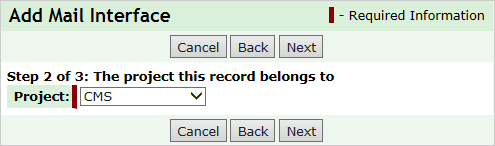
Click Next to proceed with the wizard or Back to go back to the previous step. Click Cancel to discard all changes and close the form without saving.
Step three. Specify additional parameters for all records created through this e-mail interface connection.
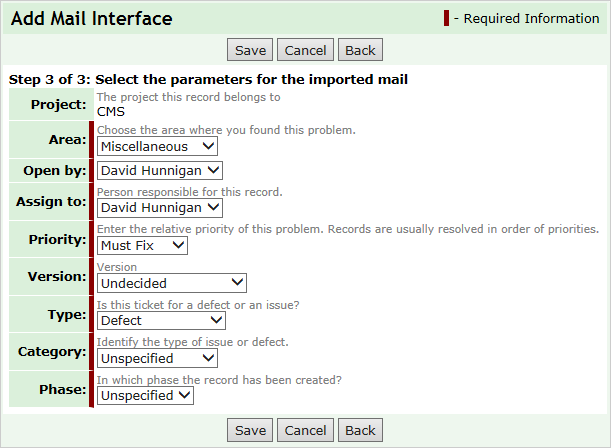
Click Save to save mail interface settings or Back to go back to the previous step. Click Cancel to discard all changes and close the form without saving.
In the list of configured mail interfaces, basic statistics data of the last run is displayed, for example, time and number of imported messages or an error message, if an error occurred.

E-mail client settings
To ensure that BUGtrack and your e-mail client do not compete, in your e-mail client settings for this account, specify that copies of messages should be left on the server for at least one day.
Next: Custom Entry Forms